Simple Sinatra example using IronRuby
My first Ruby application recently went live a month or two back. I’ve been meaning to get some experience with Ruby for quite a while now, but it took a real project to actually get a chance to really do something with it. Of course, “real project” in this case is a project that just as easily could have been coded in static HTML :-).
The project turned out to building a website for Arkansas Pediatric Therapy, which is the company that my wife does speech therapy for. The initial requirements for the site were to just get some static content out there, but it still gave me an opportunity to use some Ruby to build the site.
Because the site really has no database needs of any kind yet, I ended up choosing to use Sinatra instead of Rails. For deployment, I used Heroku. I was also able to incorporate some basic integration with the Google Maps API. For my JavaScript framework, I used jQuery. For the web design, I ended up asking one of my coworkers, Tim Franklin, to help me out. His web design skill far exceed mine, so that was definitely the right choice.
So, basically, I took the initial requirements to build an easy static HTML site and ran! Was it overkill? I don’t think so - I ended up learning a lot and I don’t have duplication of HTML all over the place. It should be pretty easy to add dynamic content later if I wish to. It really didn’t take a lot more time either. (NOTE: I did use webgen at first to build a static HTML version of the site. If you really just want static content, I can definitely recommend using it to take advantage of templates.)
But… the post title is about IronRuby… did I use IronRuby for this site? Actually, I didn’t. I might’ve tried it, but I’m pretty sure that Heroku doesn’t support IronRuby currently. Maybe some future site can take advantage of IronRuby. What I want to do is share some of this cool Ruby knowledge with my predominantly .NET readership using IronRuby.
So, here are the steps you can take to build your first Sinatra application using IronRuby!
Downloading, Installing IronRuby, and Adding it Your Path
First, you’ll have to download IronRuby. At the time of this post, it looks like the most current version is 0.9.1 though I used 0.9.0 for the post. The release is just a ZIP file, so all you have to do is extract it and go. I would recommend extracting the zip to your C:\ drive (or root somewhere) as opposed to somewhere under Program Files. Why? Well, I initially dropped mine under Program Files and received an error when trying to install the sinatra gem. I ended up finding this post to fix it - the problem is that the one of the paths is too long (check out all the information about the infamous MAX_PATH constant).
You should have a directory that looks something like c:\ironruby-0.9.1 with the rest of the files underneath it. Next, you’ll need to add the bin directory to your path. For now, I’m just going to add it to my PowerShell profile instead of adding it for the entire system. Here’s all you have to do:
$env:path += ';C:\ironruby-0.9.0\bin'Once this is done, the IronRuby commands should all be in scope. You can verify this by running “Get-Command ir*” which should return all of the commands under the IronRuby bin directory.
Installing the Sinatra Gem
.NET developers share code by sharing their assemblies. Ruby developers share code by using gems. If you wish to use a .NET library, you usually have to pull up a browser, download a zip file, extract it and then add a reference to the assembly. If you wish to use a gem, you use the gem command and ask it to install it for you. Like so:
gem install sinatraThen, to actually “reference” the gem in your code, you just “require” the dependencies you have.
require 'rubygems'require 'sinatra'Of course, we’re using IronRuby, so the commands are slightly different.
igem install sinatraIf you wish to see all of the gems installed locally, just run:
igem list -localAfter installing Sinatra, you should see at least the following gems installed:

NOTE: If you happen to be at work and are behind a proxy, you might have trouble with the gem install command. Ruby and RubyGems take the Unix/Linux approach to proxies. That is, they’re expecting you to have an environment variable set up named HTTP_PROXY. I have a PowerShell script that I run to initialize this for me, but it basically just does this (assuming you have populated the required PowerShell variables):
$env:http_proxy = "http://$username:$password@$proxy:$proxyPort"I use the Get-Credential cmdlet so that I don’t have to hardcode my username and password anywhere.
Patching Sinatra to run with IronRuby First
Now… you’re not done with installing Sinatra yet. Sinatra doesn’t yet support IronRuby out of the box (as of sinatra 0.9.4 anyway). Check out the IronRuby documentation on patching Sinatra to get it to run under IronRuby. Basically, you can open the base.rb code file (mine was under C:\ironruby-0.9.0\lib\IronRuby\gems\1.8\gems\sinatra-0.9.4\lib\sinatra) and paste in the patched code. Comment on the post if you’re unsure how to read and apply a patch.
Your First Sinatra Application in IronRuby
Now, we’re ready to create the first IronRuby code file. Below is the code:
require 'rubygems'require 'sinatra'
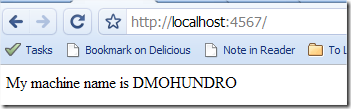
get '/' do "My machine name is #{System::Environment::machine_name}"endPretty easy, huh? I’ve already pointed out the require statements further up the post. The next three lines illustrate the magic and simplicity of sinatra (and of Ruby). Sinatra bills itself as a “DSL for quickly creating web applications in Ruby with minimal effort.”
What those lines say is, when the ’/’ path (the root of the site) receives an HTTP GET, respond with the string “My machine name is” and then the evaluated machine name that sinatra is running on. Note that I’m using System.Environment.MachineName from the .NET Framework. Note also that I reference the MachineName property using machine_name instead. This illustrates IronRuby’s name mangling feature which maps CLR property and method names to use Ruby’s naming standards.
Running It!
To run your code in sinatra, you use the ir command (ir = IronRuby) against your Ruby source file. You should see something like the following when you run it:
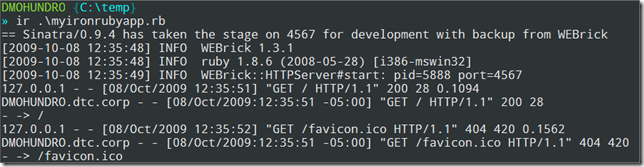
In case you missed it from the screenshot, sinatra outputs that it “has taken the stage on 4567 for development.” 4567 is the port that sinatra is listening on. This means you can browse to http://localhost:4567.
You should see something like the following when you browse to this address.
So, there you go. Your first Sinatra app with IronRuby. If there is interest, I’ll share more about how you can use Sinatra including how to use ERB to have templates with Sinatra.

Discuss this post on Bluesky →